About tags
A tag is an identifier, a one or two-word phrase that you add to a constituent's profile in order to distinguish them from other constituents.
Tags are an easy way to sort your constituents into groups based on the interests, preferences and special attributes that set them apart. You may have constituents that are major donors, prospect donors, volunteers, board members, event attendees, interested in a particular program, given to a particular campaign, etc. Tags help you organize your constituents into groups that share similar characteristics.
How to tag an individual contact
Follow these steps to add a tag to one of your contacts.
Login to https://4agc.com as a Nonprofit User.
Click on Contacts on the left menu.
You will see a list of all your contacts.
Find the contact in the list.
Click the row of the Contact you wish to add a Tag for.
You are now seeing that contact's profile.
On the right of the profile, you'll see Tags.
Click Edit.
Type the name of your Tag in the box. If it has been used before it will appear in a list you can select.
Click Add to add that Tag. You can add as many tags as you like.
Click Update to save your Tag(s).
Your Tag(s) will now appear on that contact's profile.

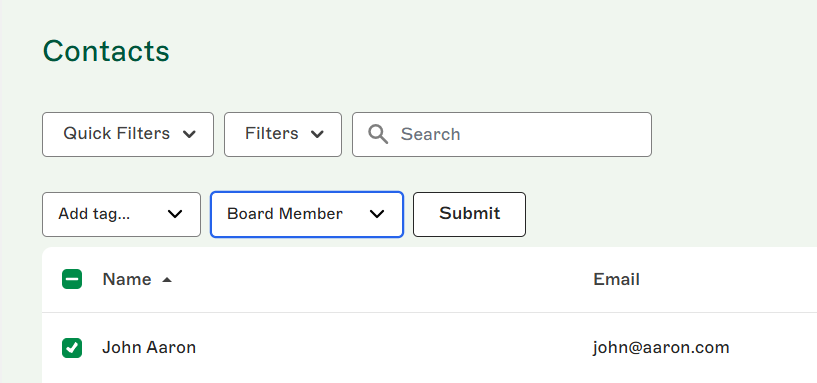
How to tag multiple contacts
Follow these steps to add a tag or remove a tag from your contacts in bulk.
Login to https://4agc.com as a Nonprofit User.
Click on Contacts on the left menu.
You will see a list of all your contacts.
Select the boxes to the left of each Contact you wish to tag.
Use the Bulk Actions menu above the dataset to select the action you wish to take on the selected records. You can select Add Tag or Remove Tag.
You'll then see the tags available. Select the Tag to add or remove.
Click Submit.
How to automatically tag contacts as they donate
You can automatically tag contacts when they donate to or order from a specific fundraising campaign. For example, you can use this feature to automatically tag contacts who purchase tickets to your next event. This allows you to easily follow up with attendees, send event updates, or promote future events based on their interests.
Login to https://4agc.com as a Nonprofit User.
Click on Campaigns on the left menu.
You will be presented with a list of your current campaigns.
Click the Menu icon on the right for the campaign you need to edit.
Select Edit from the menu.
You will be in the Campaign Info tab.
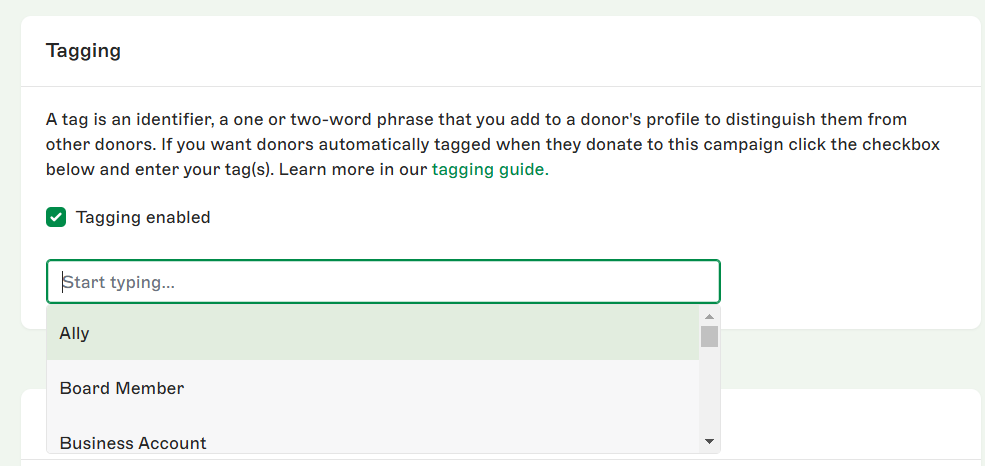
Scroll down to find Tagging.
Click the checkbox Tagging enabled.
Enter or select tags you wish to apply to contacts as they donate or order from this campaign.
Scroll down to the bottom of that page to click the button to Update that aspect of the campaign.
How to tag contacts during an import
See our guide on importing contacts.
How to automatically tag recurring donors
4aGoodCause comes with automatic tagging of your recurring donors.
Donors with an active recurring donation subscription will be tagged as "Active Recurring Donor". Donors who cancel their recurring donation subscriptions will be tagged as "Lapsed Recurring Donor". This helps you search for recurring donors based on their current status.
If you need to disable this feature follow these steps:
Login to https://4agc.com as a Nonprofit User.
Click on Settings on the left menu.
Click on Automation on the left menu.
Uncheck the checkbox under Recurring Giving - Automatic Tagging.
Click Save.

How to edit a tag
Login to https://4agc.com as a Nonprofit User.
Click on Contacts on the left menu.
Click on Tags on the left menu.
Find the tag you need to edit.
Click the three-dot menu on the right of the tag name.
Select Edit.
Update the name of the tag and click Update Tag.
The change will be applied to all existing contact records with that tag.
How to delete a tag
Login to https://4agc.com as a Nonprofit User.
Click on Contacts on the left menu.
Click on Tags on the left menu.
Find the tag you need to delete.
Click the three-dot menu on the right of the tag name.
Select Delete.
Confirm your deletion.
The tag will be removed from all contacts.
How to use tags
You've tagged your contacts. Now what? Now you’re ready to run simple tag-based searches that create segmented lists of contacts you can export for email and other communications.
To search and filter your contacts by tag follow these steps.
Login to https://4agc.com as a Nonprofit User.
Click on Contacts on the left menu.
You will see a list of all your contacts.
Above this list, you will see a search box with a Filters drop-down list to its left.
Click the Filters dropdown.
Choose Tagged With as your filter.
Enter one of your Tags into the box below that.
Click Add Filter.
The list of contacts will be updated with this filter to show you only the contacts that have this Tag applied to his or her profile.
If you wish to export this list click Download CSV or Download Excel on the right.